LETS MAKE A 36-INCH TOASTER
OVEN Page 3
or
LETS MAKE A COATING CURING
OVEN FOR RIFLES
Page 3
The oven temperature will be
controlled with a $4 light dimmer, wall mount style.

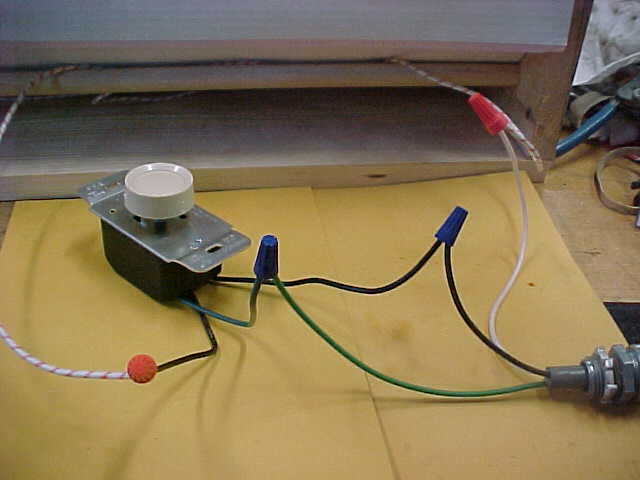
This shows the wiring
connections. This is just an illustration, the final
wiring will be in a "Handy" box with a cover. The power cord can be
seen in the lower right. The cord has a black, white and green wire. I used a
dimmer with a Green (ground) wire, so I connected the green wire from the
dimmer and the green wire from the power cord together. If you use a dimmer
without a ground wire, connect the green wire from the power cord to the metal
box. The black wire from the power cord goes to one of the black wires from the
dimmer while the white wire from the power cord goes to one of the wires from the
heating strip. In the picture above, the white wires with the red marks are the
heater wires. The remaining heater strip wire connects to the remaining black
wire from the dimmer.

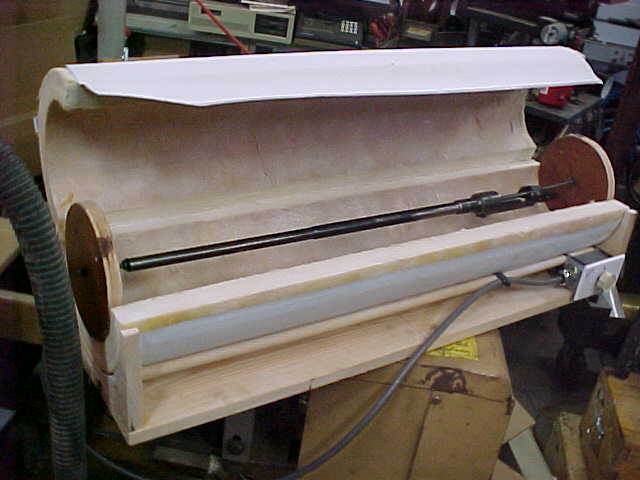
Now cut 2 (or more) disks
having a diameter equal to the inside diameter of the oven. Drill one 1/4-inch
hole in the center of each and one hole about 1-inch from the edge. Get a piece
of 1/4-inch all-thread rod 1-inch longer than the oven along with a hand full
of 1/4-inch nuts and washers.

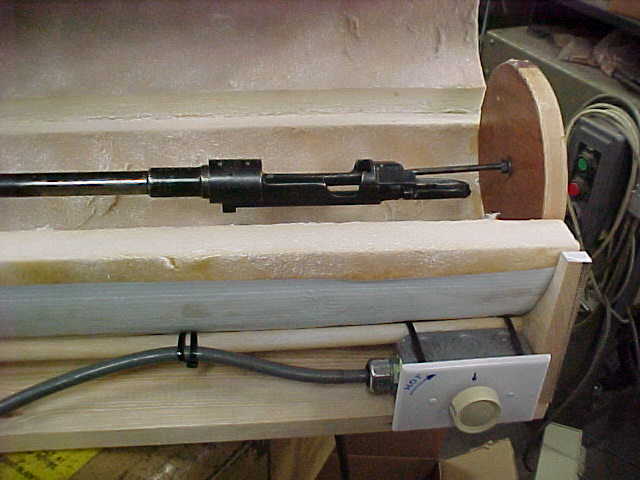
Above shows a Mauser action on the rod with the rod through the center
holes of the end pieces. Use a nut and washer on either side of the end pieces
and adjust them so as to place the ends atop the screws at each end. Place the
rod through the off-center holes, position the rod at the top of the oven and
hang small pieces for curing.

A 1/4-inch rod will work for
bore diameters of 6.5mm and up. For smaller bores, or if you don't like the
idea of passing a threaded rod through your barrel, use a piece of drill rod (Wholesale Tool)
and make some stop collars. Most drill rod is only available in 36-inch
lengths.
Miscellaneous Ramblings………
- The biggest
problem is getting a small (wattage wise) length of heater wire. Most
heating elements are 700 watts and larger. My oven, with 1 1/2 thick walls
works well with 200 or so watts. If you can find a 220-volt element, it
will make 1/4 of its rated wattage when used at 120 volts. This means that
if you use a 1000-watt, 220-volt element with 120-volt power it will make
only 250 watts. (Perfect)
- You may
consider using a toaster oven heater and it's associated control, or a hair dryer. If
anyone comes up with a workable idea please let
me know.
- I have not
made any firm dimensional statements, as you will have to build around the
insulation you come up with. The 6-inch (6 3/4-inch ID) insulation seems
just about right.
- Watch out
for the "paper" outer coating on some insulation as it may be
foil coated on the inside. Tear away the "paper"/foil around the
screws that may be hot-electrically.
- Wood seems
to stand 350 degrees so a wooden box 6x6x3?-inches
with a hinged lid may work.